> ## Documentation Index
> Fetch the complete documentation index at: https://docs.a1base.com/llms.txt
> Use this file to discover all available pages before exploring further.
# Setup your own custom mail domain on A1Mail
> Instead of using @a1send.com or @a101.bot, setup your own custom email addresses to send and receive emails.
⏰ Estimated setup time: 20min.
### In this guide you will:
### 1. Create a subdomain on your hosting provider for mail:
* Log onto your hosting provider (Cloudflare, Namecheap, etc.)
* Add a new subdomain called `mail` e.g `mail.yourdomain.com`
### 2. Connect your subdomain to A1Mail
* Go to the [email dashboard](https://www.a1base.com/dashboard/email-addresses)
* Add in your new subdomain to generate DKIM keys
1
### 3. Update and test your DNS records
* Update the MX record
* Add SPF, DKIM, and DMARC records for deliverability and anti-spam
* Verify your DNS records are properly configured
### 4. Warm up your new mail domain
* Create a new email with your subdomain and send some emails to your new address
* Start sending emails using the A1Base API
### Guide Shortcuts:
* [Go to the guide for **Namecheap**](#-guide-for-namecheap)
* [Go to the guide for **Cloudflare**](#-guide-for-cloudflare)
***
# **Namecheap Guide**
#### 1. Log into your Namecheap dashboard
* Go to [https://www.namecheap.com](https://www.namecheap.com/)
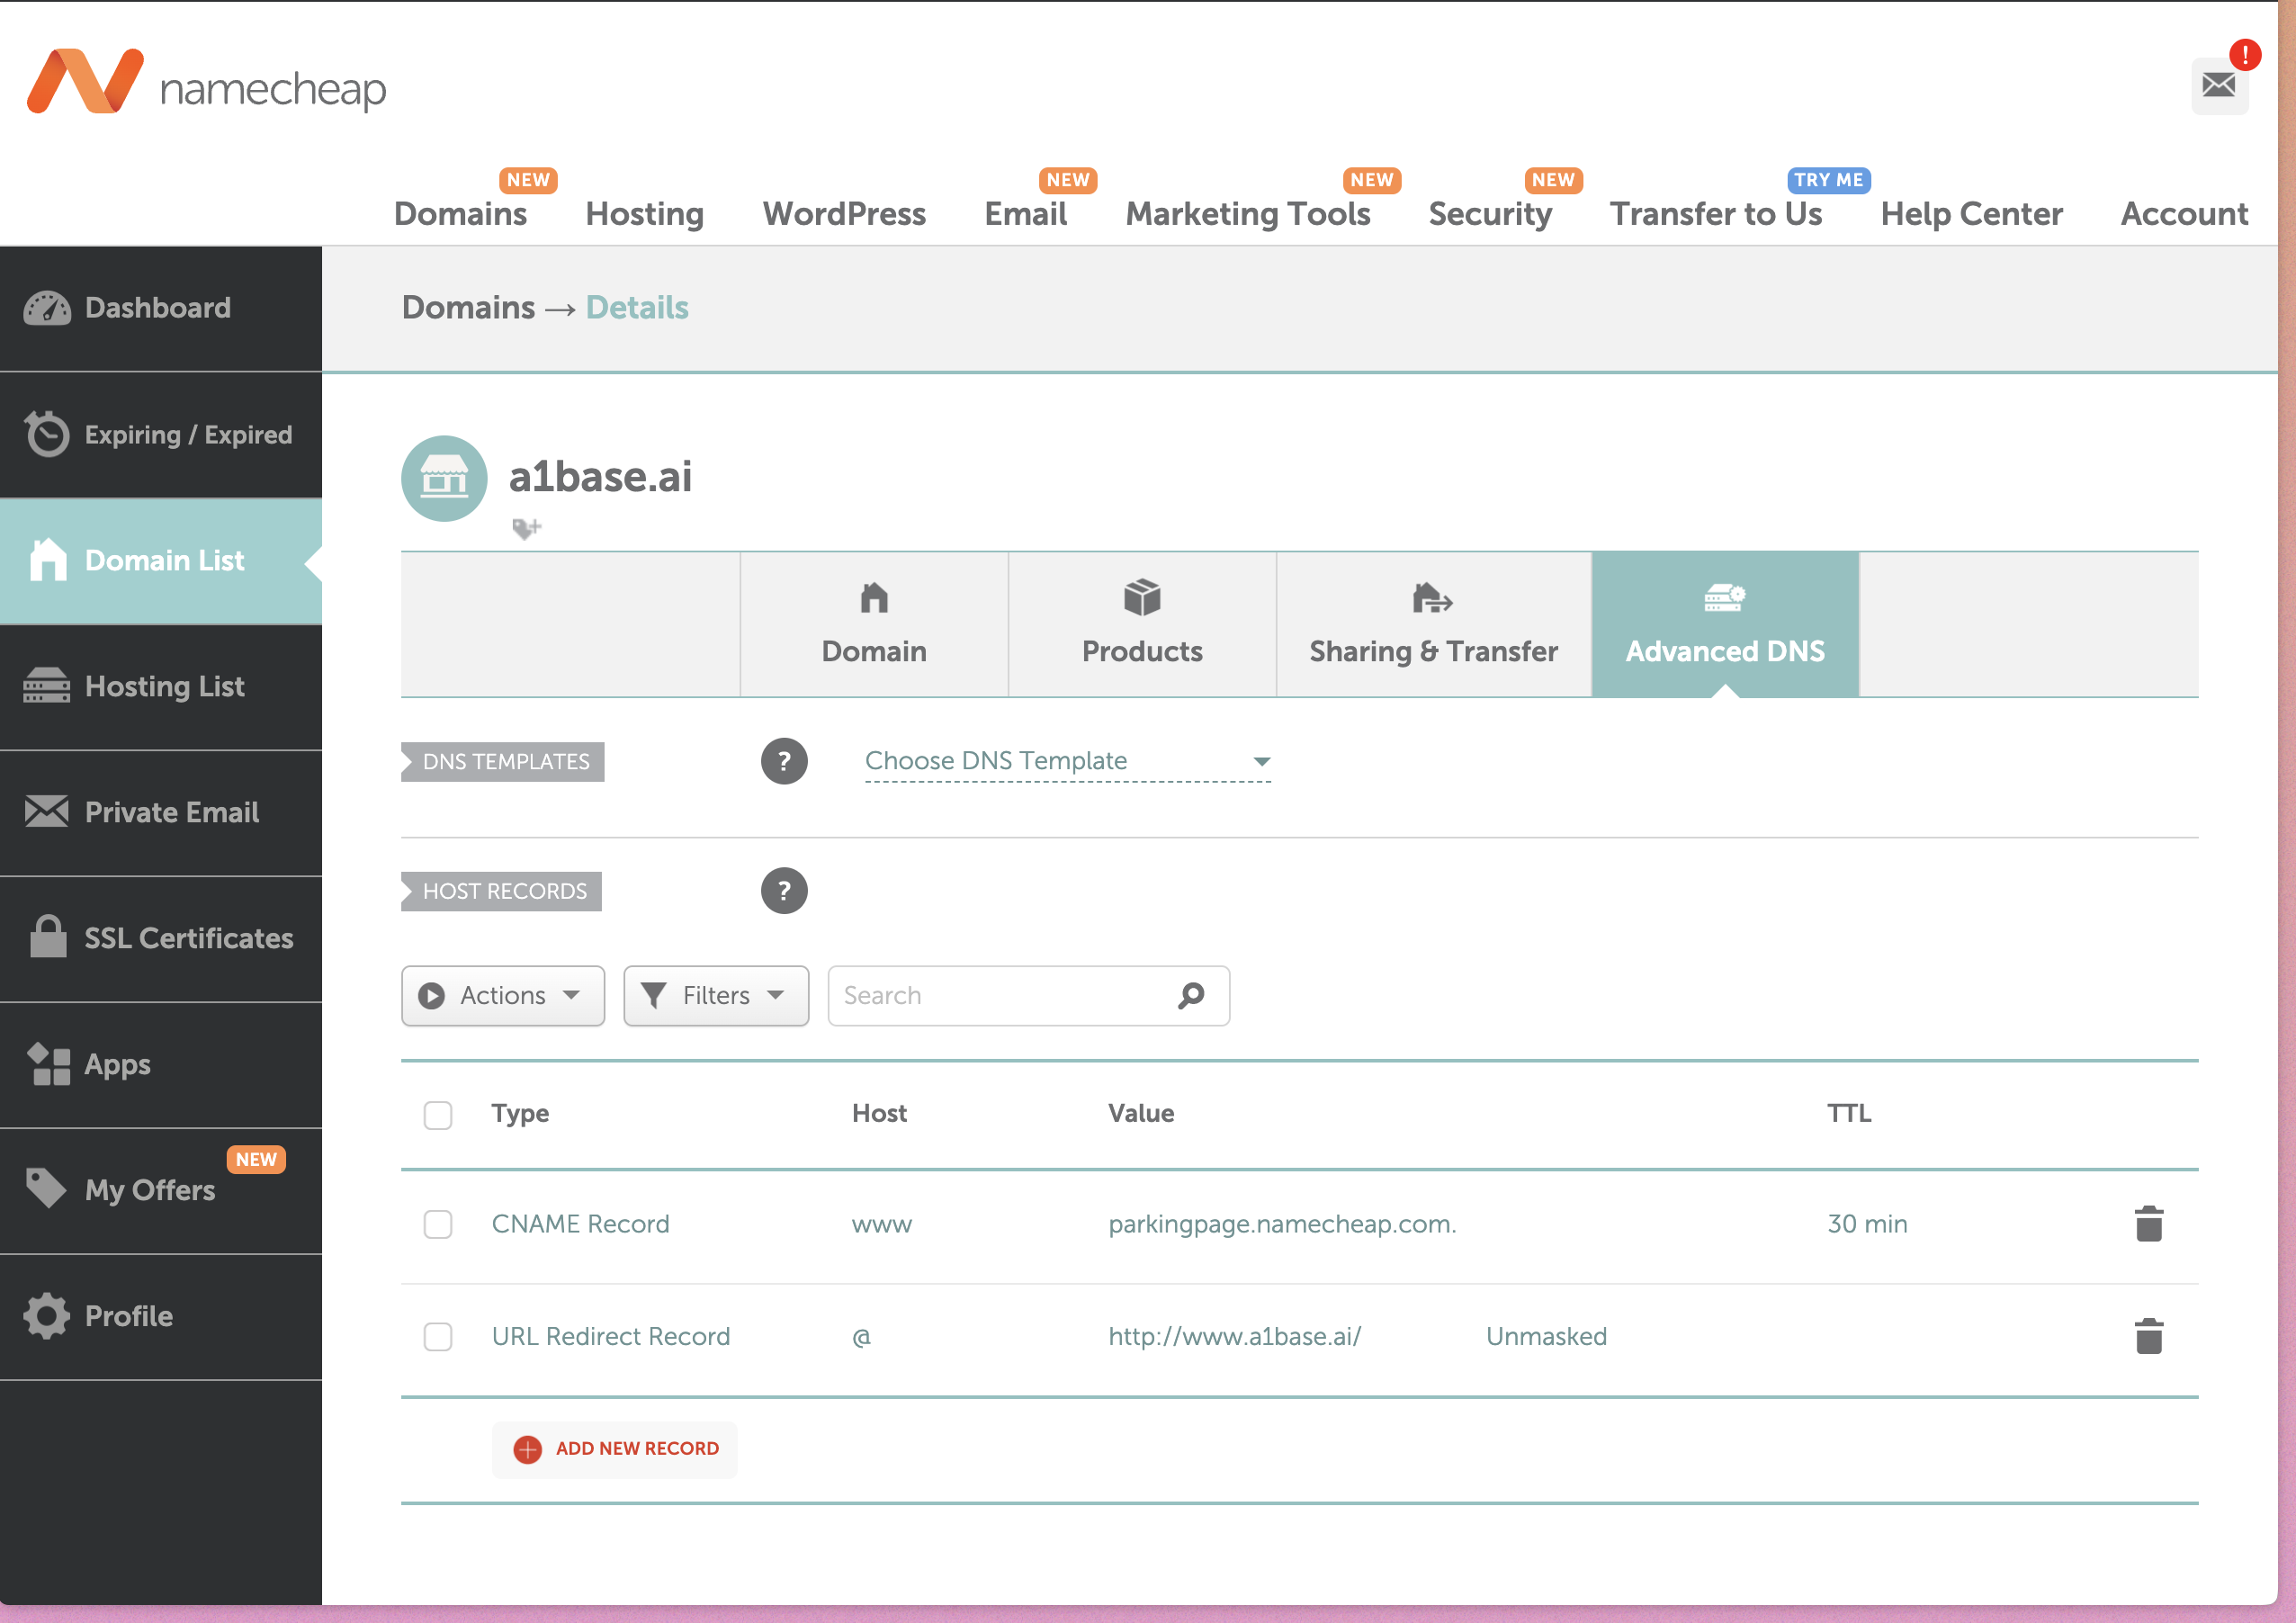
* Navigate to **Domain List > Manage** next to `yourdomain.com`
* Navigate to **Advanced DNS**
 ***
#### 2. Add an A Record for `mail.example.com`
> This points your new mail subdomain, mail.example.com to the server's IP address.
* In the **Advanced DNS** tab click **Add New Record**
* Select `A Record` and enter the following:
```jsx theme={null}
Host: `@ or mail if your subdomain is mail.example.com`
Value: `110.232.112.135`
TTL: Automatic
```
***
#### 3. Add an MX Record for email delivery
> This tells other mail servers where to deliver email for example.com.
* Still in **Advanced DNS,** scroll down to MAIL SETTINGS
* Next to "MAIL SETTINGS", select the option "Custom MX" and enter the following:
```jsx theme={null}
Type: `MX Record`
Host: `@`
Value: `mail.a101.bot`
Priority: `10`
TTL: Automatic
```
***
#### 4. Update A1Mail Dashboard and get your DKIM values
* Go to your [A1Mail dashboard](https://www.a1base.com/dashboard/email-addresses) and navigate to the **Custom Mail Domain** section
* Enter your new mail subdomain to get your DKIM keys
#### 5. Add the TXT Records for SPF, DKIM, and DMARC
> These records are for deliverability and anti-spam
* Go back to the **Advanced DNS** tab click **Add New Record**, select `TXT RECORD` for the following:
**SPF Record**
```jsx theme={null}
Type: TXT
Host: mail
Value: v=spf1 ip4:110.232.112.135 a:mail.a101.bot ~all
TTL: Automatic
```
**DMARC Record**
```jsx theme={null}
Type: TXT
Host: _dmarc
Value: v=DMARC1; p=none; rua=mailto:postmaster@subdomain.yourdomain.com
TTL: Automatic
```
**DKIM Record**
* Copy the host and value from the A1Mail dashboard
```jsx theme={null}
Type: TXT
Host:
Value: e.g v=DKIM1; h=sha256; k=rsa; t=y; p=asdfgasdfasdf...
TTL: Automatic
```
### Summary:
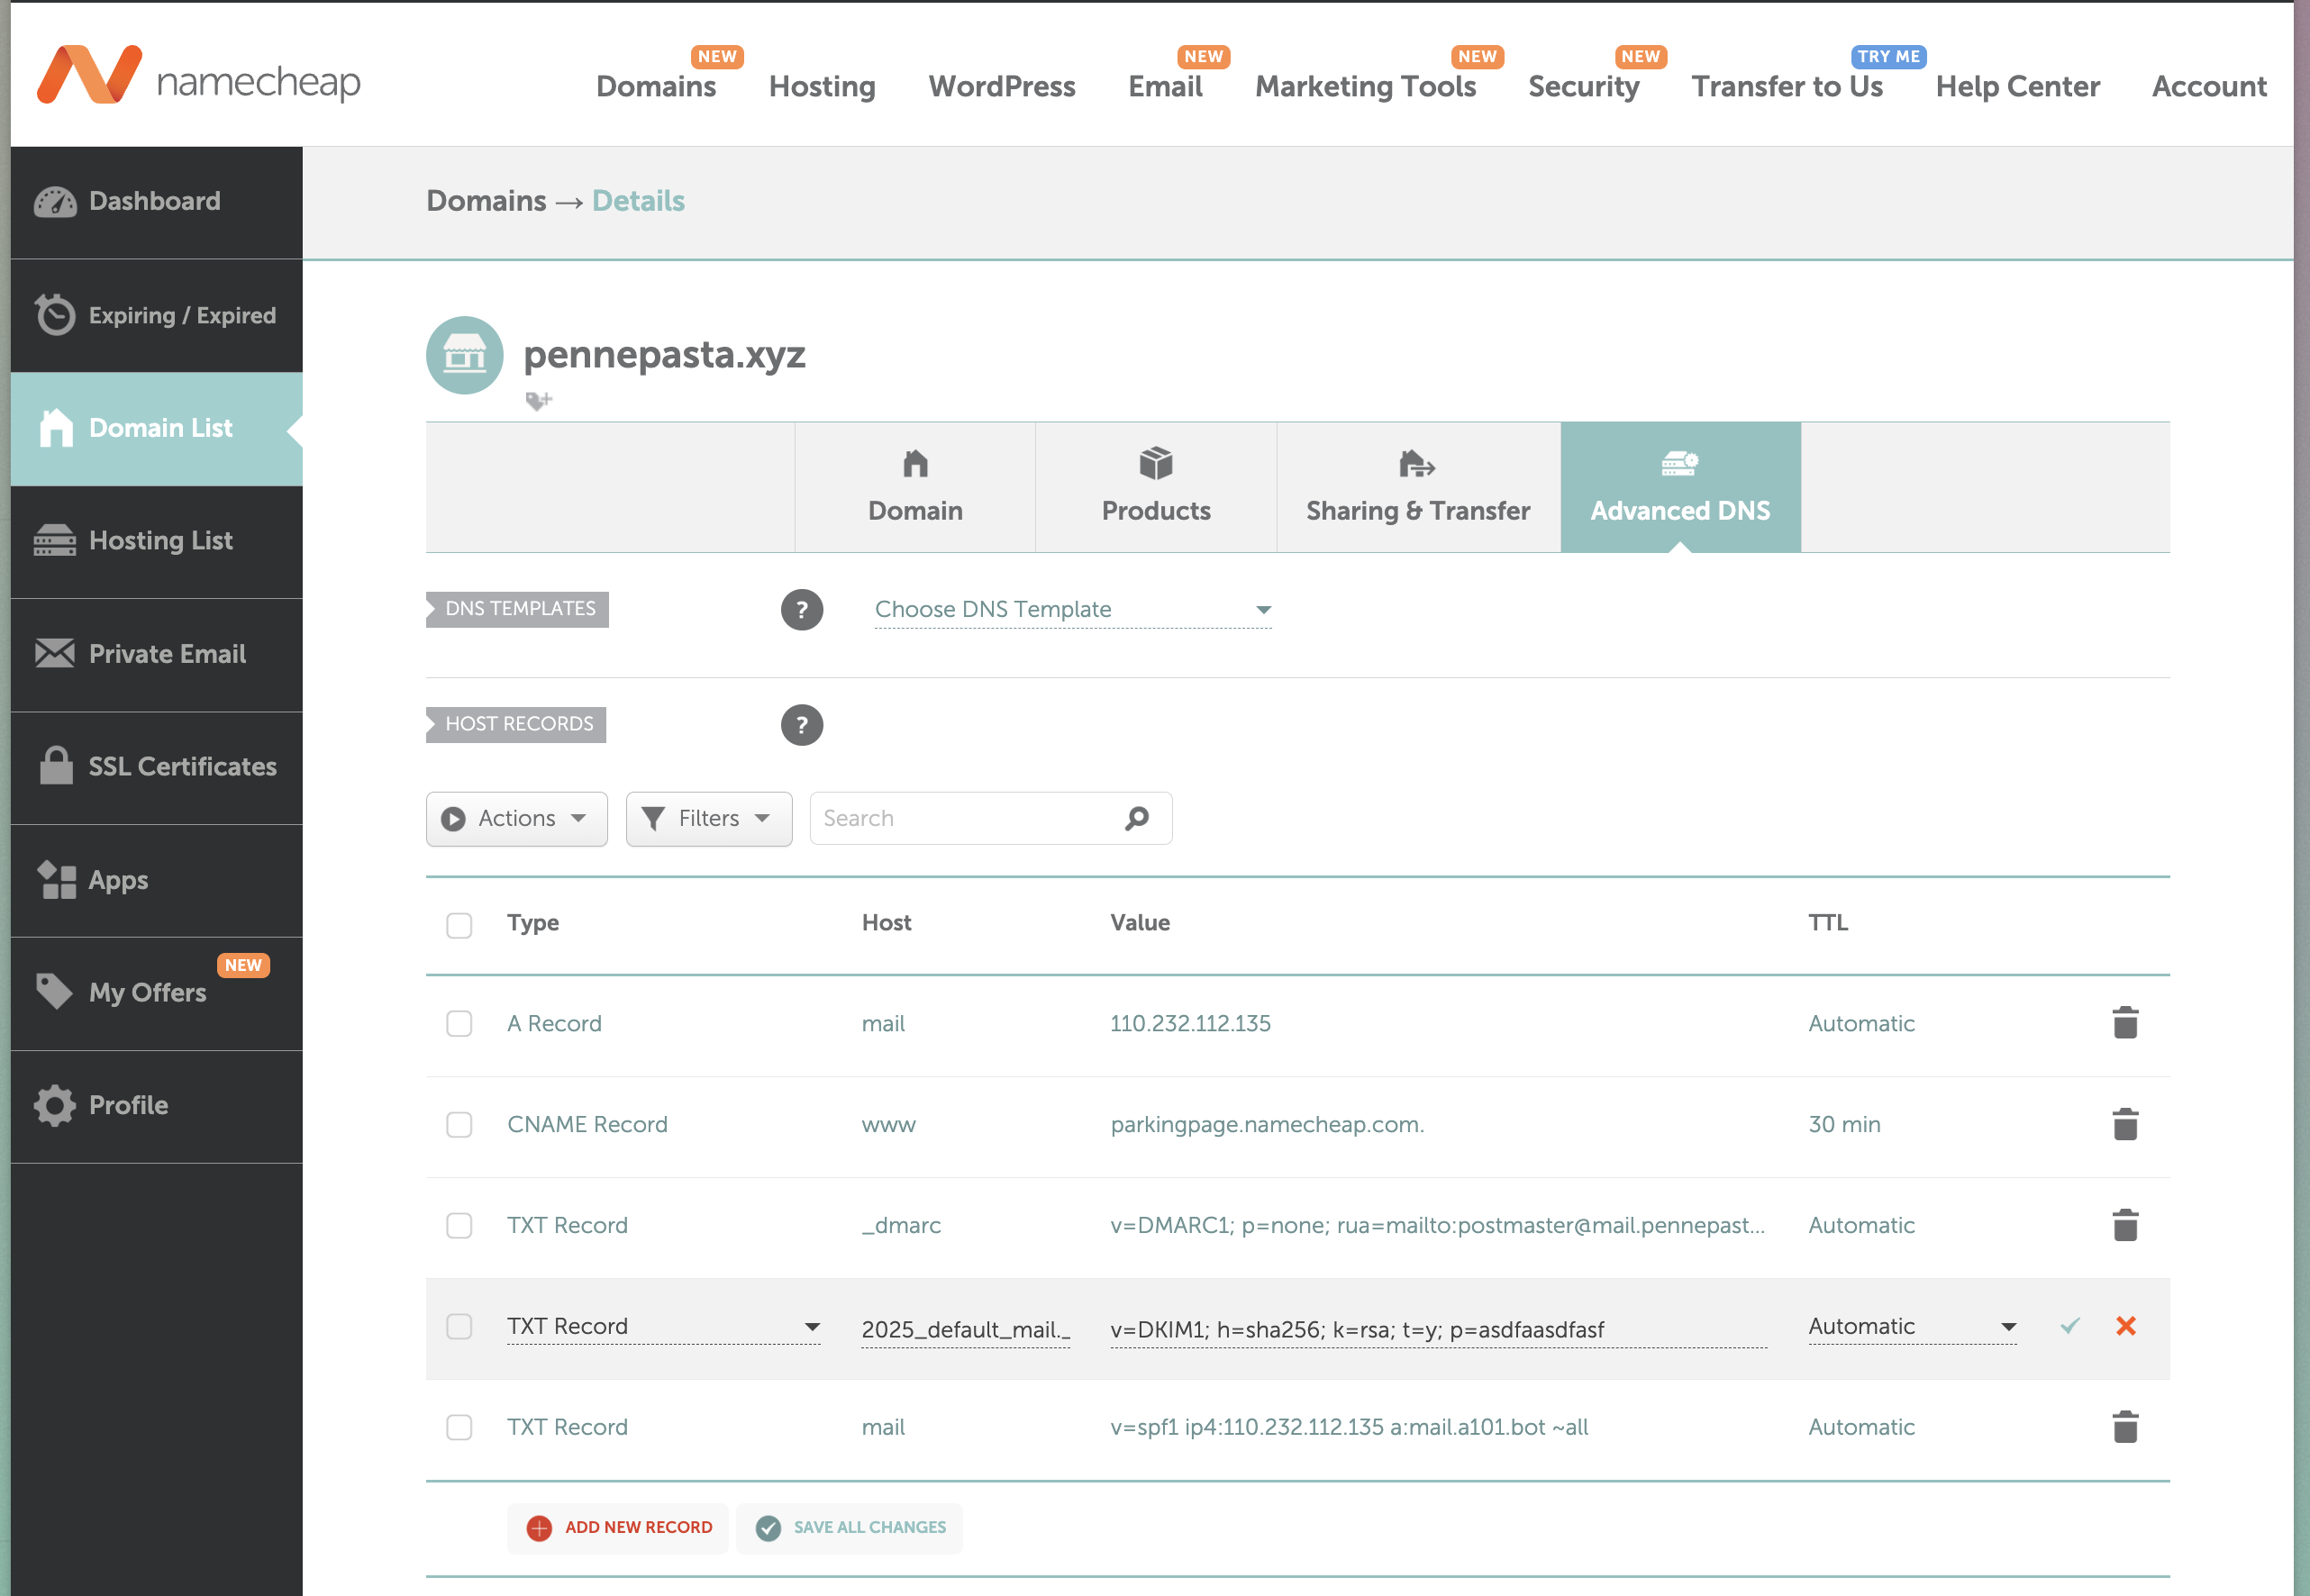
> You should have these records in your Advanced DNS Settings
| **Record** | **Type** | **Host** | **Value** | **Priority** | **TTL** |
| ---------- | -------- | -------------------------------------------------------- | ------------------------------------------------------------------------------------------------- | ------------ | --------- |
| SPF | TXT | mail | `v=spf1 ip4:110.232.112.135 a:mail.a101.bot ~all` | — | Automatic |
| DMARC | TXT | \_dmarc | `v=DMARC1; p=none; rua=mailto:postmaster@subdomain.yourdomain.com` | — | Automatic |
| DKIM | TXT | the domain key we've provided e.g `subdomain._domainkey` | The value we've provided - this will look like: `v=DKIM1; h=sha256; k=rsa; t=y; p=AsDSDGGJGKA...` | — | Automatic |
| MX | MX | @ | `mail.a101.bot` | 1 | Automatic |
***
#### 2. Add an A Record for `mail.example.com`
> This points your new mail subdomain, mail.example.com to the server's IP address.
* In the **Advanced DNS** tab click **Add New Record**
* Select `A Record` and enter the following:
```jsx theme={null}
Host: `@ or mail if your subdomain is mail.example.com`
Value: `110.232.112.135`
TTL: Automatic
```
***
#### 3. Add an MX Record for email delivery
> This tells other mail servers where to deliver email for example.com.
* Still in **Advanced DNS,** scroll down to MAIL SETTINGS
* Next to "MAIL SETTINGS", select the option "Custom MX" and enter the following:
```jsx theme={null}
Type: `MX Record`
Host: `@`
Value: `mail.a101.bot`
Priority: `10`
TTL: Automatic
```
***
#### 4. Update A1Mail Dashboard and get your DKIM values
* Go to your [A1Mail dashboard](https://www.a1base.com/dashboard/email-addresses) and navigate to the **Custom Mail Domain** section
* Enter your new mail subdomain to get your DKIM keys
#### 5. Add the TXT Records for SPF, DKIM, and DMARC
> These records are for deliverability and anti-spam
* Go back to the **Advanced DNS** tab click **Add New Record**, select `TXT RECORD` for the following:
**SPF Record**
```jsx theme={null}
Type: TXT
Host: mail
Value: v=spf1 ip4:110.232.112.135 a:mail.a101.bot ~all
TTL: Automatic
```
**DMARC Record**
```jsx theme={null}
Type: TXT
Host: _dmarc
Value: v=DMARC1; p=none; rua=mailto:postmaster@subdomain.yourdomain.com
TTL: Automatic
```
**DKIM Record**
* Copy the host and value from the A1Mail dashboard
```jsx theme={null}
Type: TXT
Host:
Value: e.g v=DKIM1; h=sha256; k=rsa; t=y; p=asdfgasdfasdf...
TTL: Automatic
```
### Summary:
> You should have these records in your Advanced DNS Settings
| **Record** | **Type** | **Host** | **Value** | **Priority** | **TTL** |
| ---------- | -------- | -------------------------------------------------------- | ------------------------------------------------------------------------------------------------- | ------------ | --------- |
| SPF | TXT | mail | `v=spf1 ip4:110.232.112.135 a:mail.a101.bot ~all` | — | Automatic |
| DMARC | TXT | \_dmarc | `v=DMARC1; p=none; rua=mailto:postmaster@subdomain.yourdomain.com` | — | Automatic |
| DKIM | TXT | the domain key we've provided e.g `subdomain._domainkey` | The value we've provided - this will look like: `v=DKIM1; h=sha256; k=rsa; t=y; p=AsDSDGGJGKA...` | — | Automatic |
| MX | MX | @ | `mail.a101.bot` | 1 | Automatic |
 ***
# **Cloudflare Guide**
#### 1. Log into your Cloudflare dashboard
* Go to [https://dash.cloudflare.com](https://dash.cloudflare.com/)
* Select your domain from the list
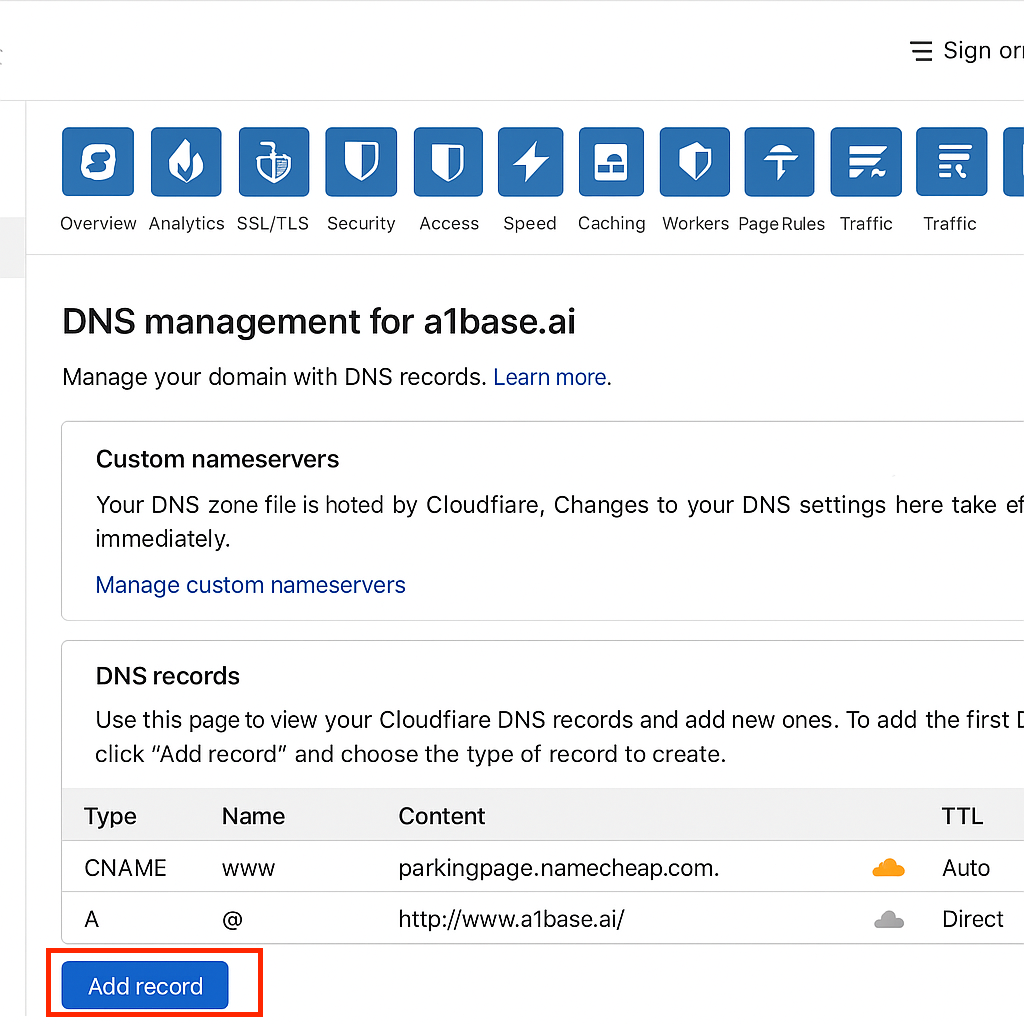
* Navigate to the **DNS** tab
***
# **Cloudflare Guide**
#### 1. Log into your Cloudflare dashboard
* Go to [https://dash.cloudflare.com](https://dash.cloudflare.com/)
* Select your domain from the list
* Navigate to the **DNS** tab
 ***
#### 2. Add an A Record for `mail.yourdomain.com`
> This points your new mail subdomain to the server's IP address.
* Click **Add record**
* Select `A` for the Type and enter the following:
```jsx theme={null}
Type: A
Name: mail
IPv4 address: 110.232.112.135
TTL: Auto
Proxy status: DNS only (gray cloud)
```
***
#### 3. Add an MX Record for email delivery
> This tells other mail servers where to deliver email for your domain.
* Click **Add record** again
* Select `MX` for the Type and enter the following:
```jsx theme={null}
Type: MX
Name: @ (represents the root domain)
Mail server: mail.a101.bot
Priority: 10
TTL: Auto
```
***
#### 4. Update A1Mail Dashboard and get your DKIM values
* Go to your [A1Mail dashboard](https://www.a1base.com/dashboard/email-addresses) and navigate to the **Custom Mail Domain** section
* Enter your new mail subdomain to get your DKIM keys
#### 5. Add the TXT Records for SPF, DKIM, and DMARC
> These records are for deliverability and anti-spam
* Click **Add record** for each of the following TXT records:
**SPF Record**
```jsx theme={null}
Type: TXT
Name: mail
Content: v=spf1 ip4:110.232.112.135 a:mail.a101.bot ~all
TTL: Auto
```
**DMARC Record**
```jsx theme={null}
Type: TXT
Name: _dmarc
Content: v=DMARC1; p=none; rua=mailto:postmaster@yourdomain.com
TTL: Auto
```
**DKIM Record**
* Copy the host and value from the A1Mail dashboard
```jsx theme={null}
Type: TXT
Name: (without your domain)
Content:
TTL: Auto
Proxy status: DNS only (gray cloud)
```
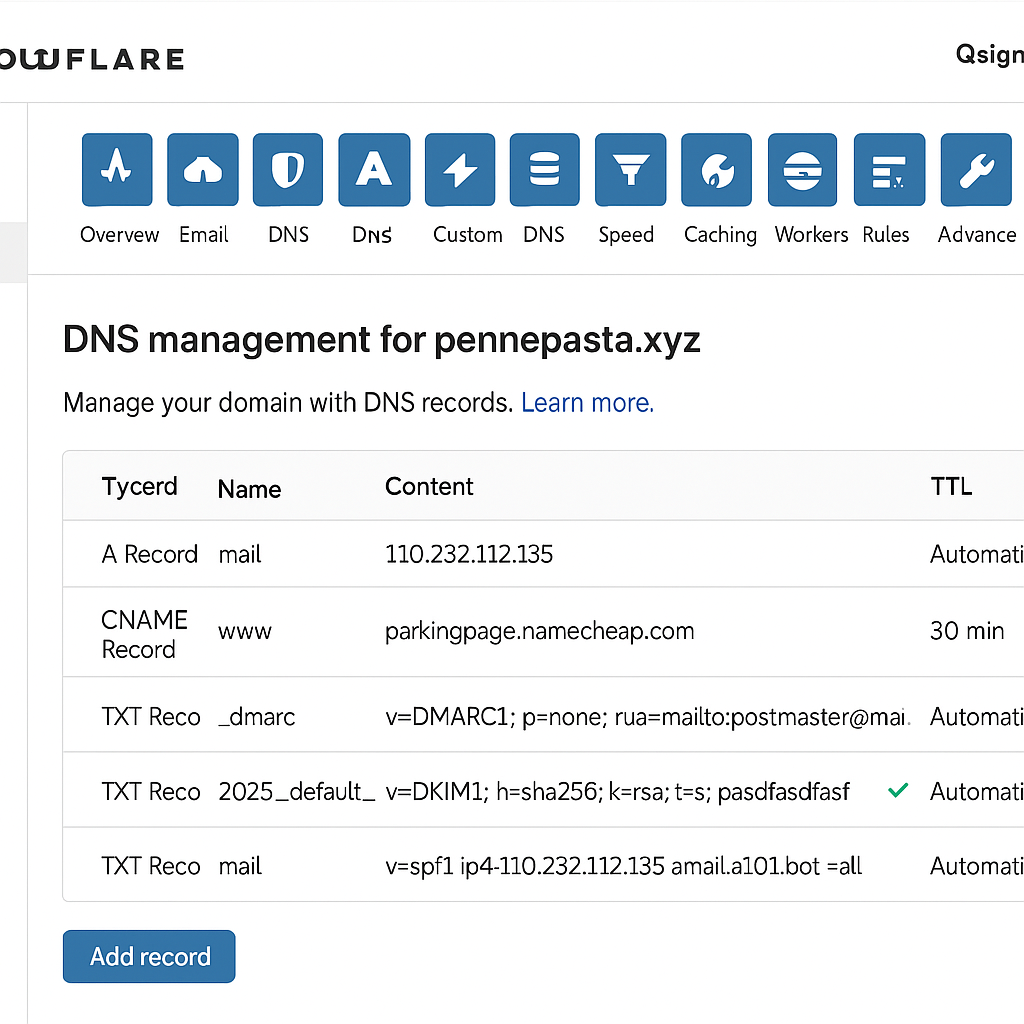
### Summary:
> You should have these records in your Cloudflare DNS settings
| **Record** | **Type** | **Name (Host)** | **Content (Value)** | **Priority** | **TTL** | **Proxy Status** |
| ---------- | -------- | --------------- | -------------------------------------------------------- | ------------ | ------- | ---------------- |
| A | A | mail | `110.232.112.135` | — | Auto | DNS only |
| SPF | TXT | mail | `v=spf1 ip4:110.232.112.135 a:mail.a101.bot ~all` | — | Auto | DNS only |
| DMARC | TXT | \_dmarc | `v=DMARC1; p=none; rua=mailto:postmaster@yourdomain.com` | — | Auto | DNS only |
| DKIM | TXT | from dashboard | from dashboard | — | Auto | DNS only |
| MX | MX | @ | `mail.a101.bot` | 10 | Auto | DNS only |
> 🔒 **Important**: Make sure all email-related records have the proxy disabled (gray cloud). Email services require direct DNS resolution to function properly.
***
#### 2. Add an A Record for `mail.yourdomain.com`
> This points your new mail subdomain to the server's IP address.
* Click **Add record**
* Select `A` for the Type and enter the following:
```jsx theme={null}
Type: A
Name: mail
IPv4 address: 110.232.112.135
TTL: Auto
Proxy status: DNS only (gray cloud)
```
***
#### 3. Add an MX Record for email delivery
> This tells other mail servers where to deliver email for your domain.
* Click **Add record** again
* Select `MX` for the Type and enter the following:
```jsx theme={null}
Type: MX
Name: @ (represents the root domain)
Mail server: mail.a101.bot
Priority: 10
TTL: Auto
```
***
#### 4. Update A1Mail Dashboard and get your DKIM values
* Go to your [A1Mail dashboard](https://www.a1base.com/dashboard/email-addresses) and navigate to the **Custom Mail Domain** section
* Enter your new mail subdomain to get your DKIM keys
#### 5. Add the TXT Records for SPF, DKIM, and DMARC
> These records are for deliverability and anti-spam
* Click **Add record** for each of the following TXT records:
**SPF Record**
```jsx theme={null}
Type: TXT
Name: mail
Content: v=spf1 ip4:110.232.112.135 a:mail.a101.bot ~all
TTL: Auto
```
**DMARC Record**
```jsx theme={null}
Type: TXT
Name: _dmarc
Content: v=DMARC1; p=none; rua=mailto:postmaster@yourdomain.com
TTL: Auto
```
**DKIM Record**
* Copy the host and value from the A1Mail dashboard
```jsx theme={null}
Type: TXT
Name: (without your domain)
Content:
TTL: Auto
Proxy status: DNS only (gray cloud)
```
### Summary:
> You should have these records in your Cloudflare DNS settings
| **Record** | **Type** | **Name (Host)** | **Content (Value)** | **Priority** | **TTL** | **Proxy Status** |
| ---------- | -------- | --------------- | -------------------------------------------------------- | ------------ | ------- | ---------------- |
| A | A | mail | `110.232.112.135` | — | Auto | DNS only |
| SPF | TXT | mail | `v=spf1 ip4:110.232.112.135 a:mail.a101.bot ~all` | — | Auto | DNS only |
| DMARC | TXT | \_dmarc | `v=DMARC1; p=none; rua=mailto:postmaster@yourdomain.com` | — | Auto | DNS only |
| DKIM | TXT | from dashboard | from dashboard | — | Auto | DNS only |
| MX | MX | @ | `mail.a101.bot` | 10 | Auto | DNS only |
> 🔒 **Important**: Make sure all email-related records have the proxy disabled (gray cloud). Email services require direct DNS resolution to function properly.
 ***
# **Test your DNS Settings**
After setting up your DNS records, it's essential to verify that they are properly configured. Here's how:
#### 1. Check your DNS records
* Use a DNS lookup tool (e.g., [MxToolbox](https://mxtoolbox.com/)) to verify your DNS records
* Check that your MX, SPF, DKIM, and DMARC records are correctly set up
* For detailed instructions, follow our [How to Verify your DNS Settings](verify-dns-settings) guide
#### 2. Test email delivery
* Send an email to your new custom domain address. By default, all new mail domains will have a `postmaster@yourdomain.com` inbox
* If the email is delivered successfully, you can move on to the next step
#### Running into issues?
> Feel free to reach out to [founders@a1base.com](mailto:founders@a1base.com) directly if you run into any issues during the setup process.
***
# **Warm up your new mail domain**
After setting up your custom mail domain, you'll need to properly warm it up to ensure good deliverability. Here's how:
#### 1. Create a new email with your subdomain
* Create an email address using your new subdomain (e.g., `hello@mail.example.com`)
* Follow our [Creating Email Addresses guide](api-reference/email/create-email) for detailed instructions
#### 2. Send some test emails to your new address
* Send emails from your personal accounts (Gmail, Outlook, etc.) to your new address
> 💡 **Warming up tips**: New email domains need time to build reputation. Start with low volumes (5-10 emails/day) for the first week, then gradually increase. Avoid sending mass emails immediately after setup.
#### 3. Receiving emails
* Check that incoming emails are properly delivered to your new address
* For more details on receiving and managing emails, see our [Receiving Emails guide](api-reference/email/receiving-email)
#### 4. Send emails using the A1Base API
* Once your domain is properly warmed up, start sending emails programmatically
* Use the A1Base API to send emails from your custom domain address
* Follow our [Sending Emails guide](api-reference/email/sending-email) for implementation details
Note:
* Engage with these emails by replying to them
* This helps establish a positive sending reputation for your domain
We'd love to hear from you!
Don't hesitate to reach out to [pennie@a1base.com](mailto:pennie@a1base.com) or [pasha@a1base.com](mailto:pasha@a1base.com) if there's any features you'd like to see or prioritised!
***
# **Test your DNS Settings**
After setting up your DNS records, it's essential to verify that they are properly configured. Here's how:
#### 1. Check your DNS records
* Use a DNS lookup tool (e.g., [MxToolbox](https://mxtoolbox.com/)) to verify your DNS records
* Check that your MX, SPF, DKIM, and DMARC records are correctly set up
* For detailed instructions, follow our [How to Verify your DNS Settings](verify-dns-settings) guide
#### 2. Test email delivery
* Send an email to your new custom domain address. By default, all new mail domains will have a `postmaster@yourdomain.com` inbox
* If the email is delivered successfully, you can move on to the next step
#### Running into issues?
> Feel free to reach out to [founders@a1base.com](mailto:founders@a1base.com) directly if you run into any issues during the setup process.
***
# **Warm up your new mail domain**
After setting up your custom mail domain, you'll need to properly warm it up to ensure good deliverability. Here's how:
#### 1. Create a new email with your subdomain
* Create an email address using your new subdomain (e.g., `hello@mail.example.com`)
* Follow our [Creating Email Addresses guide](api-reference/email/create-email) for detailed instructions
#### 2. Send some test emails to your new address
* Send emails from your personal accounts (Gmail, Outlook, etc.) to your new address
> 💡 **Warming up tips**: New email domains need time to build reputation. Start with low volumes (5-10 emails/day) for the first week, then gradually increase. Avoid sending mass emails immediately after setup.
#### 3. Receiving emails
* Check that incoming emails are properly delivered to your new address
* For more details on receiving and managing emails, see our [Receiving Emails guide](api-reference/email/receiving-email)
#### 4. Send emails using the A1Base API
* Once your domain is properly warmed up, start sending emails programmatically
* Use the A1Base API to send emails from your custom domain address
* Follow our [Sending Emails guide](api-reference/email/sending-email) for implementation details
Note:
* Engage with these emails by replying to them
* This helps establish a positive sending reputation for your domain
We'd love to hear from you!
Don't hesitate to reach out to [pennie@a1base.com](mailto:pennie@a1base.com) or [pasha@a1base.com](mailto:pasha@a1base.com) if there's any features you'd like to see or prioritised!